Monday 29 June 2015

EFGT - Completed


It has taken a while and a lot of effort but I think I can call this finished.
This has been my biggest project to date, measuring 75cm x 20cm with 55 painted figures. And to think this started when my wife bought me the set and said ' I want a bridge ' She is delighted with the result, I am a lucky man to have a wife so interested in what I do.
Back to the project and here is the final overall view.


I almost feel like these two dead !!!

Thanks for looking and I hope you like it.


Monday 22 June 2015

EFGT - Base Part 4

Bridge together at last and this is really taking shape how I envisioned.
I am still to decide on whether to attach a rope hand rail.

The below two photos show how the bridge looks from either end. I didn't want it straight and it was a bit of a challenge to get it to fit together, but thankfully I did.


And finally a view of the steep incline up to the far rock section to the left.

So the good news now is that I can start attaching figures, working on some conversions and look toward the end of this piece.

Sunday 21 June 2015

EFGT - Base Part 3 Painting Rocks

When it comes to painting rocks I saw many people just paint them black them give a couple a grey dry brushes, not bad for a quick look but I wanted a more realistic feel. So my method works through a variation of greys and browns to give that look.
Each colour is applied in dry brushes, heavy to start with, then becoming increasingly lighter.

So to start
I applied a heavy drybrush of Vallejo Dark Blue Grey over the black primer.

The next layer is the first coat of brown, in this case GW Desert Yellow.

Next up a coat of Vallejo Neutral Grey

Now some GW Graveyard Earth.
Already I am starting to vary the areas I cover to break up uniformity.

Vallejo Sky Grey.
Quite a light colour so this time a little more concentration for the edges and raised areas.

Army Painter Skeleton Brown, continuing the raise area approach with lighter drybrushes.

Now some Vallejo Dead White on the very highest points.
Now you can see the other colours starting to come through and the area just has that look of life to it.

Now I apply a green wash. I have chosen Vallejo German Field Grey. A lovely muted green with its grey tones helps set a nice dusky feel.

Once this has dried and went back over with the Vallejo Sky Grey

And to finish a final coat of Vallejo Dead White.

Two photos of the separate stone areas to show the overall look. The bottom photo is a little lighter than reality, but I feel it still gives the idea. The top photo is about right.


Thanks for looking and I hope it helps give you a different idea for your rocks.

Friday 19 June 2015

EFGT Base - Part 2

You can see that I have added a second section to the wooden pathway, like I have previously stated, this lets you know that it leads somewhere.
There is a slight fall to the planks as I did not want it perfectly square, horizontal and even. It was put together by Goblins, who to my knowledge were never regarded for their architecture.

The next step was icing the cake. A good helping of polyfilla was used.

The below two photo's show that the surface was rough. Too rough for me.


To bring texture I used the following tools.
A piece of sponge from a blister pack
A sculpting tool
A toothbrush.
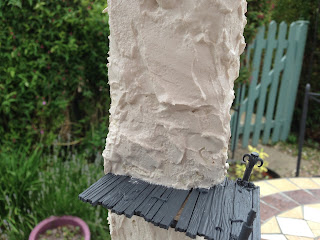
The first step is to use the sponge and toothbrush before the plaster coating dries

Here is a close up of what the surface begins to look like once you have sponged and toot brushed the surface.
It is smoother but has a dimpled finish that is very similar to the rock sections on the throne, therefore making them fit together. 

And here is how the tower section now looks

Finally the whole thing was primed ready for painting.

Next up I will be applying the paint.

Tuesday 16 June 2015

EFGT Base - Part 1

The base is either going to make or break this diorama. It needs to look right, obviously, but I like my bases to have some degree of authenticity. That is where I hope this thing will head.
So then, you have seen the first section and throne all painted up, well my plan is to a rope bridge running from that section.
A fight will be ensuing on the bridge and hopefully one or two goblins will be knocked off.
So to bring that to reality.
I need something to attach the other end of the bridge to so I will construct a stone section.
This must be secure as it cannot have any movement or the thing will fall apart, I also want it to last.
To start then I have used a piece of 10mm dowel I had spare and have put a screw into it from the underside to hold it tight.


Always looking to try new products I saw this from Gorilla Glue. As I use there super glue and know how excellent this is, I had to try this varient.
It states it is water activated and can be used on foam. As I'm using insulation foam it seemed perfect.
You have to wet one side of the surface and apply glue to the other and leave it to set.

And here is what I used it on. I drilled a hole in the foam and applied a glob of the glue.
At the edges, where the base meets the foam I did get some foaming as the surfaces reacted.
I was fearing a melt down but fortunately this wasn't the case.
When dried it was absolutely solid.
You can see I have roughly chopped out the surface to start the rock face look.

With that done I channelled out small area and inserted some planking I had cut up from the set. This will be where the top section of the bridge will be attached to.

 The throne will be set to the right as you look below and to allow me to have figures hanging from the bridge then this area would also need to be raised.
Using the same method of using pieces of dowel, 5mm on these parts, I have constructed another rock area.

While this was drying I attacked some more boarding and applied that to the rock column to show that this area does lead off somewhere.

Everything has been put to bed for the night to allow it all to thoroughly dry but the below photo was taken before I attached the second rock area.
It shows how each section will work together.

The only other thing I have done is attach some posts along the bridge and at the rock column side that will accommodate the rope.
That will be much later on.
The next phase will be coating and the foam and creating the rock texture.