Saturday 30 May 2015

EFGT - Bombur Tutorial

I have decided to do this tutorial for a couple of reasons. First was to help someone on the One Ring push his painting and secondly was to show how to paint a quick figure. I spent about. 3 hours on him once I take away the photographing.

So to start then, rules.
Never overload the brush
Let the brush kiss the figure, no hard pressure used here.
All colours where applied in several coats, you never apply one coat of paint, if you do it's too thick.

Next my selection of brushes, I have used three on this figure as you see below
Left to right
Da Vinci 10/0 for ultra fine detail
Da Vinci 00 for small detail
W&N Series 7 size 0 as my work horse

As for paints, I will be using GW, Army Painter and Vallejo. All paints were thinned using water only.
I took very quick photos on my iPhone during the painting, so apologies for the quality.

I paint all my figures from the eyes out, I feel it sets the tone for the figure and get this right it makes all the difference.
I am not one of those who likes to do the eyes last, I don't trust myself enough not to ruin things.
My system for eyes is simple as you see below.
Using VMC Dead White I apply the white for the eye.
Now using Army Painter Matt Black and my smallest brush I position the pupils.

Nothing too difficult so far.
GW Bestial brown is used to shape the eye.
Don't go straight in to the edge of the eye, make a bigger eye and slowly cut the line of you paint in, tinkering here and there so you get the shape of eye you want. 
This is where you can think about an expression, is he wide eyed in shock, narrow eyes for anger, concentration and so on.

Now let's work his skin.
Using VMC Brown Sand I cover the skin areas but leaving a small outline of the eye. About three coats gets a nice smooth coverage - standard for my base coats.

I now add VMC Basic Skin Tone to the base, about 50/50 and apply to the raised areas, nose, cheeks, eyebrows, chin.

Put some VMC Light Skin Tone on your palette and add a little of the first highlight mix.
Now apply this to the raised areas, but to a smaller area. You can see I have gone for the very tip of the nose, centre of the eyebrow and so on just to pop the highlight a little more.

Remember we are doing a quick figure so I have removed a few layers.
We need a little contrast.
GW Baal Red is thinned and applied to the shaded area of the cheeks and the corners of the eyes.
A dot of GW Liche Purple was also added to the corner of the eyes.

He needs hair.
GW Fiery Orange is the basecoat, a nice vibrant colour.

With a colour this vibrant I still want it to tie in with his skin, so for this reason we use skin colours to make up our highlights.
Add VMC Light Skin Tone to the base and start working the highlights.
As the paints are thin I use several coats, applying more coats to the lighter areas. 
I've added more Light Skin Tone to the mix for the highest spots.

Now an all over glaze of the hair with Ogryn Flesh with extra layers for the darker spots.

Once dry I have reapplied the final highlight.


I started the underclothes first, choosing VMC Middlestone as the base.

For the shading I mixed in some VMC USA Olive Drab and applied a few layers into the folds.

The highlight was adding VMC buff to the base.

Now for the trousers. The base was made up of an even mix of VMC Grey Green and VMC Dark Prussian Blue.

The highlight was once again buff to the basecoat in order to start pulling all the clothing together.

Now the shade. I added some of the underclothes shade to the trousers base, with a tip of Army Painter Matt Black.
I decided to give these a second shade in the deepest areas by adding another tip of black.
I seem to have missed taking this photo !

It was time for some leatherwork. I normally use my Scale 75 set but wanted to show a quick version using other paints.
I started on the coat with a base of VMC Leather Brown.

For the first highlight I used one of my favourite go to colours VMC Sand Yellow, it's a fantastic yellow, not too bright and has a dusky appearance with good colour saturation.
I applied this on the raised areas.

Next up was to add more Sand Yellow to the mix and concentrate on the highest areas. You need to be aware of how the light falls, areas like under the arms are missed out for this highlight, how can a light from above reach this point ?

With that done I wanted some shading. VMC Dark Prussian Blue was glazed into the creases and under the arms.

Weathering leather is something that can really define the material and give your figure a simple but effective leather look.
Using VMC Buff and my fine brush I started cross hatching areas that would be subject to wear and tear. Simply apply very thin lines in a cross hatch style, with a few dots here and there. Some black lines with Buff next to them replicate cuts to the material.
Although this is a quick figure, you can see how this technique is helping the ageing and the leather look.


The gloves, bag and boots were all based with VMC Red Leather.

VMC Sand Yellow was again added for the two stages of highlight.
To shade I added VMC brown leather to the Red Leather, working the out of sight areas.
Apologies as the highlight stages were not photographed but I do hope you get the impression.

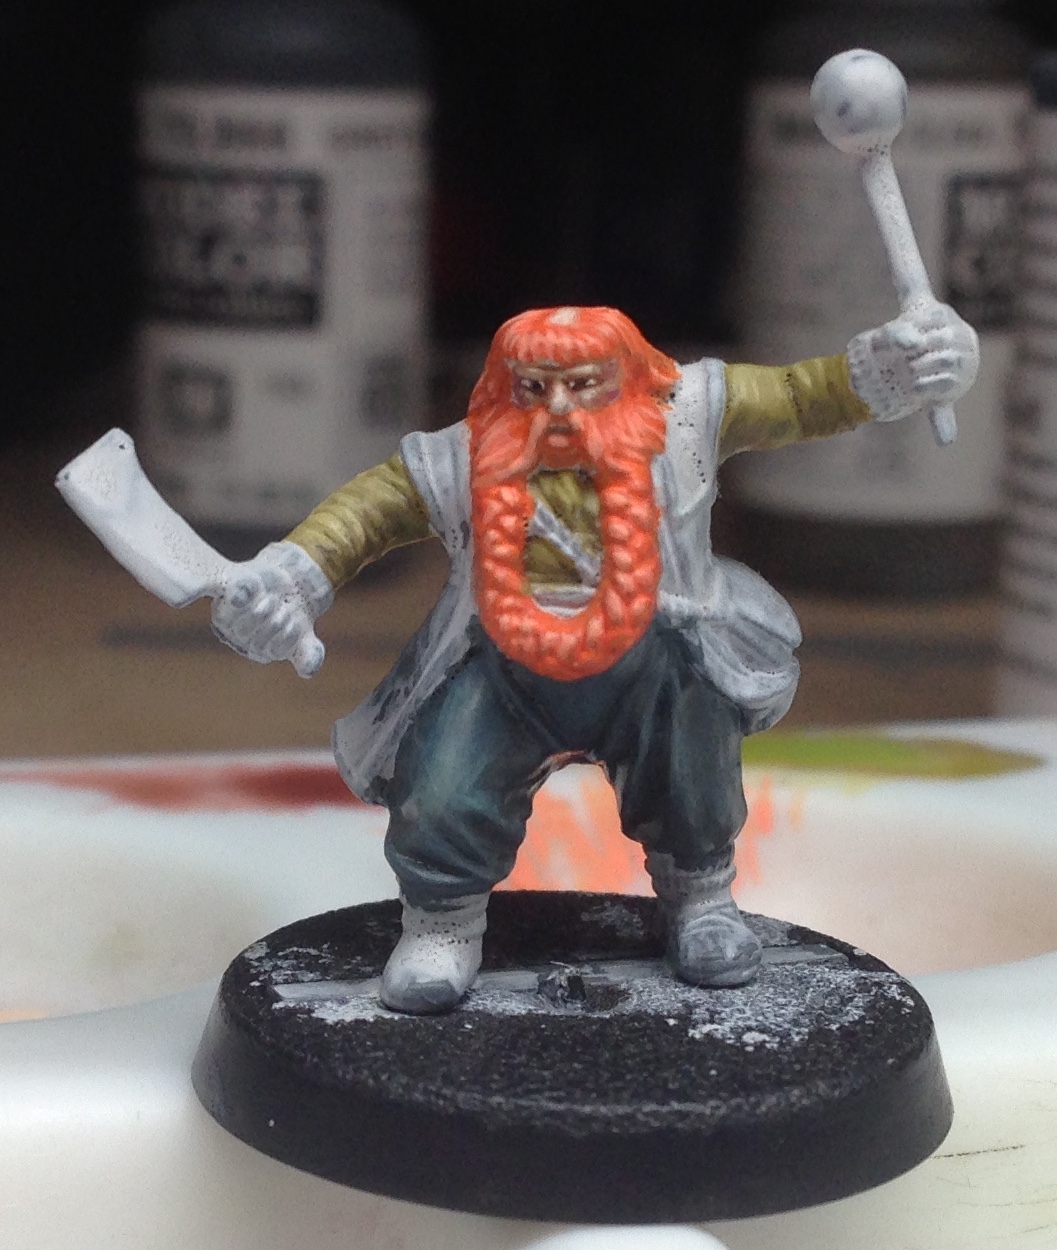
Finally the metal areas. A base mix of VMC Natural Steel and VMC USA Olive Drab was applied giving a nice dark coat to work from.

Pure Natural Sttel was the first highlight applied in a thin glaze to the higher parts and leaving the base as a shade.
The second highlight was pure VMC Silver to give some crisp edges.

And there we have it, done in about 3 hours.

What would I have done with more time ?
Concentrated on each area more thoroughly for a kick off, but a greater colour range would have been used and more contrast applied.
For example, the hair would have been deeper in the shadows so that the beard really popped.
That though is not what this was about, it was about laying down some quick paint to get through a figure and make it look half decent.

I hope you like this and find it useful.


Saturday 23 May 2015

EFGT - Nori, Bifur and Gloin

The next three are ready for the fight.
I'm cranking these out in about three hours at present. Not the best but I'm fairly satisfied with how they have turned out.

I have to admit they are becoming a tad tedious and knocking these out so quickly is not giving me any real thrill, believe me.
When I look round at sites like CMoN and see the magnificent work being done and the time and effort being placed into it, then it makes me very jealous and in need of something to spark me.
But, one thing at a time, I have this diorama to finish and with only 5 dwarves to finish we are not too far from completing them at least.
From there I will make a start at the scenery. The throne will be done first and then starting on the woodwork.

Wednesday 20 May 2015

EFGT - Kili and Fili

I have gone to town on the Scale 75 sets Leather and Wood, and Black and White to create the look for these two.
The leather being mainly used for Kili and I wanted a dark look for him.
What the photo doesn't show is the subtle changes in colour between his different garments, as to have him all black wasn't right for me and too easy.
Fili was done using more of the Black and White.
These are photographed side by side and not photoshopped or anything else like that, so you can tell how much darker Kili is.

I think it does show the versatility of these paints, they can be used to create many more effects and colours than the included guides offer.
Throwing paints together and seeing what comes out.
The photo was a quick late night one on my iPhone but it does give the idea of the glazing an gradients to some of the colours.

Still another 8 dwarves to do and I had a mental note to try and get these done by the end of the month. I can't see me hitting that but the more the merrier.
even a couple of weeks later would give me a fair shot at the base.
I have still got his throne to put together and paint, another dozen dwarves to contend with, the scribe and his rig and all to do by the end of July.

Thursday 14 May 2015

EFGT Thorin

And the next one from the set is complete.
I have tried something a little different for the armour by using some VMS Gunmetal Blue mixed with VMC natural steel to give the blue tint that you see.
I am fairly pleased with how this looks.
However, like I have alluded before, I m having to keep the quality down to get through all the painting in time.
I actually re visited this three times after i thought I had finished.

Next up will be Kili, who I am about 50% through.

Friday 8 May 2015

EFGT Bofur

Heres Bofur, text next to be finished on my Escape from Goblin Town set.
The photo does not do it any justice to be honest. Not being arrogant, just honest.
I will seriously have to spend some time working on my photography.


Wednesday 6 May 2015

EFGT Bilbo Speed Paint

I wanted to test myself to some speed painting and set myself a 2 hour limit with a limited palette.
I figured it would be a good challenge and also help me get through another figure fairly quickly.
What I forgot about was how small this figure is.
He is completely different to the older Hobbit sculpts who were a touch thicker and slightly larger heads.
That aside I got it done in the time scale and here is the result.

Sunday 3 May 2015

EFGT Goblin King Finished

With the workload I have I am going to call this finished.
I could do more, work the contrast and increase the saturation in places but I have a lot to do to finish this diorama by the end of July.
If things do move along quicker I may return to do some touching up.
One thing with the photo is the skeletons are not as yellow as they seem.
Thanks for looking and now for some dwarves.

Friday 1 May 2015

Current Workload and The Goblin King

Here is a quick shot of what I have on my work station.
The huge thing at the back is the Glottkin I am partly through putting together. There are only a couple of small pieces to go on but all the gaps need filling and smoothing out.
I have decided to treat this as a slow time project.

And the next biggest you see below with it's first coats of paint.
I want a gritty look to this fella with plenty of expression to his face. I am reasonably happy so far.
I plan plenty of gunge around his feet and lower hand, but that will be once he has been added to the diorama and I'm heading toward finishing touches.